This is a quick guide, mainly for me and as a reference. Getting this to play ball on Chan_SIP was a breeze. PJ_SIP breaks this somewhat. The guides I’ve found are focused on pure Asterisk and/or Chan_SIP. This is what I had to do to get this to play ball and work. This is for UK installations so if you aren’t in the UK or US (Defaults work for the US/Can) you will need to find your localisation settings yourself…
I’ll assume the unit has been factory reset, instructions for this are at : https://www.cisco.com/c/dam/en/us/td/docs/voice_ip_comm/csbpvga/spa100-200/quick_start/SPA232D_QSG-en_78-21580-01.pdf
First up. We need to setup the network side of things. Plug a PC into the LAN port of the 232 and make sure you get an IP address. Don’t just plug one of these into a LAN as they run a DHCP server. Login to the web UI as admin/admin…
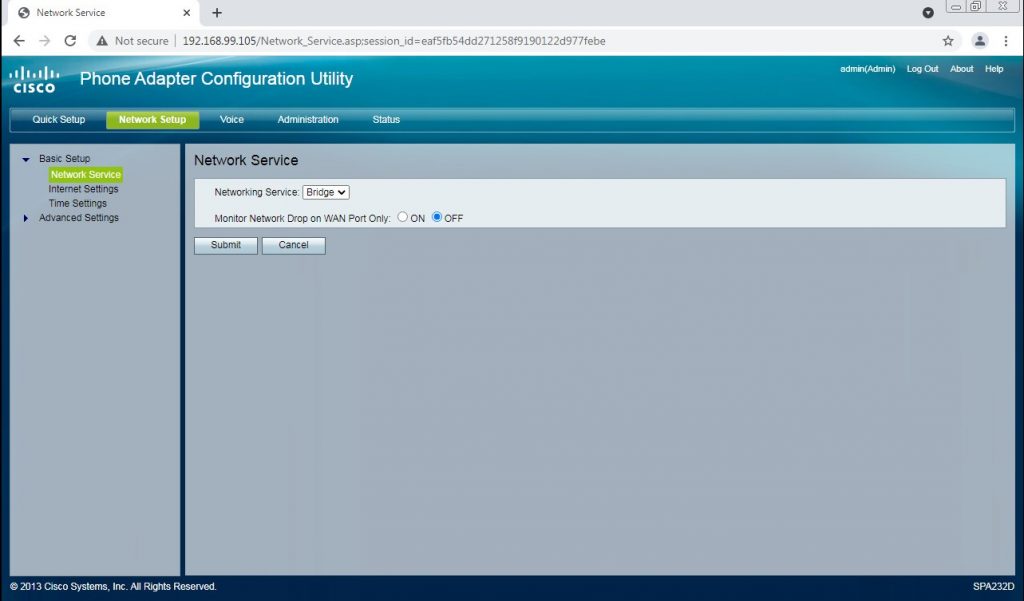
A few sites mention using the LAN port will cause issues, and left at the defaults it will. We need to disable routing and bridge those ports. Click ‘Network setup’ from the top options, then ‘basic setup’ from the side. Under the new options pick ‘Network Settings’
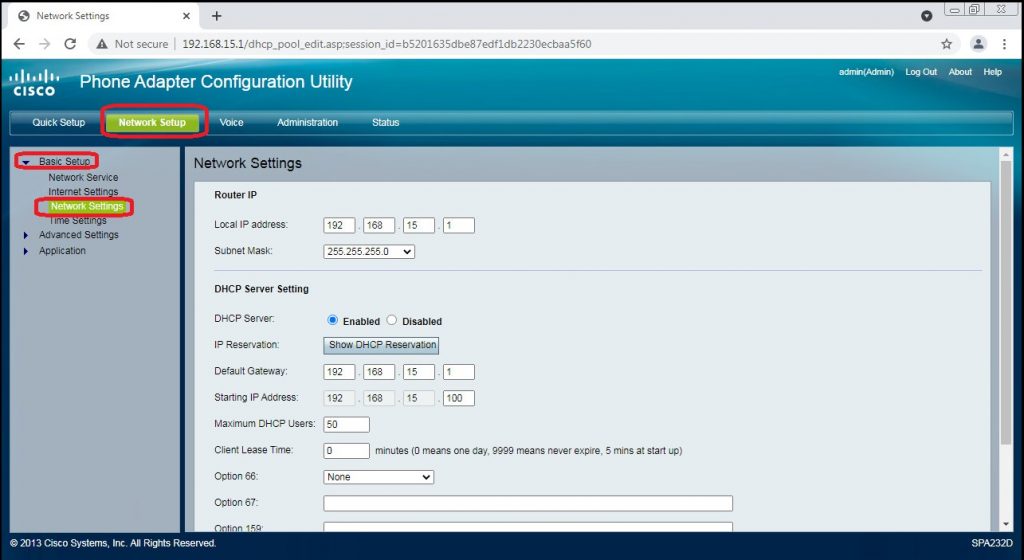
You’ll need to disable the DHCP server. Click the ‘disabled’ checkbox and hit apply. As long as you do the next step quickly you don’t need to make any networking changes to your PC. If you allow the lease to expire, you’ll need to set a static IP for your PC on 192.168.15.0/25 to continue. I’ve never had to do this.
Once the SPA has rebooted your WAN and LAN ports are connected to the same network. Either place the SPA on your main network now where it’ll get a DHCP address and reconnect your PC to your LAN or stay plugged into the SPA, it doesn’t matter at this point. It helps to know the MAC printed on the SPA if you have more than one device at this point. Log into your router or firewall/router and check your DHCP lease table / list of known devices and find where your SPA went…

If you have more than one SPA device, use the MAC to identify it. You can then re-connect with your web browser to the new address. This set of steps removes the need to go through allowing remote access and stops a layer of NAT being added to a protocol which, quite frankly, hates NAT 🙂
Before you go any further check Administration => Firmware Upgrade. Make sure you are running 1.4.1, if not click here to go and get it and update the SPA. If you don’t you may have issues with getting a 202 error making outgoing calls. The latest (and last) firmware fixes this.
I’ll now run through each page, I’ll highlight where we are changing defaults and list the changes. If I haven’t touched a field the default is just fine. Hitting submit can, depending on the screen, reboot the unit or take a while to return.

Select Network Setup=> Basic Setup, Time Settings
There is probobly no pressing need to do this but if you want to later use TLS, or the debug logs it’s worth doing. Set your timezone, time server and enable “Auto Recovery After Reboot”. Hit “Submit” and wait for the UI to return.
Voice => System, SIP and Provision have nothing to change.
Voice=> Regional
There is a fair amount here and you need to get it right or your SPA may act up. BT aren’t totally consistent across exchanges and though most of the defaults here will work, on some exchanges you may se issues with caller ID and call termination if you don’t change these… snarfed from here
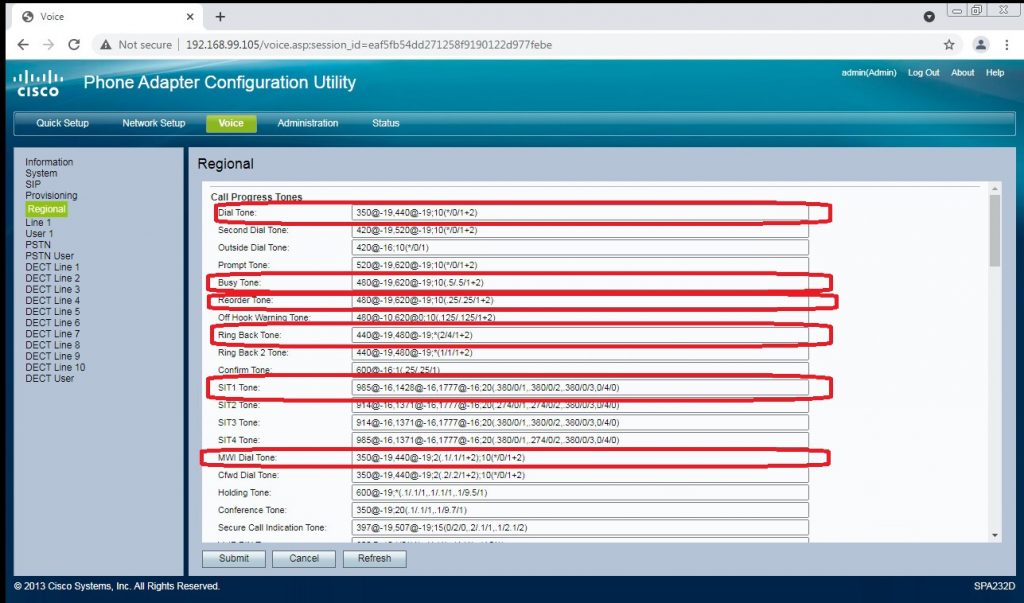
Voice > Regional > Call Progress Tones
    Dial tone: 350@-19,440@-22;10(*/0/1+2)
    Ring back: 400@-20,450@-20;*(.4/.2/1+2,.4/2/1+2)
    Busy tone: 400@-20;10(.375/.375/1)
    Reorder tone: 400@-20;10(*/0/1)
    SIT 1 tone: 950@-16,1400@-16,1800@-16;20(.330/0/1,.330/0/2,.330/0/3,0/1/0)
MWI dial tone: 350@-19,440@-22;10(.75/.75/1+2) 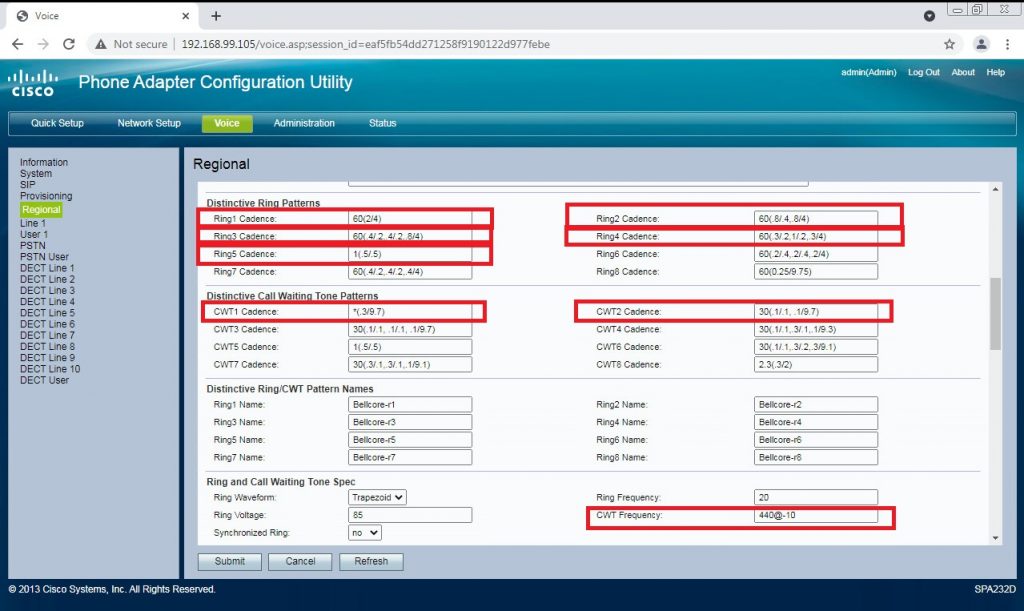
Voice > Regional > Distinctive Call Waiting Tone Patterns
    CWT1 cadence: 30(.1/2)
    CWT2 cadence: 30(.25/.25,.25/.25,.25/5)

Voice > Regional > Distinctive Ring Patterns
    Ring 1 cadence: 60(.4/.2,.4/2)
    Ring 2 cadence: 60(1/2)
    Ring 3 cadence: 60(.25/.25,.25/.25,.25/1.75)
    Ring 4 cadence: 60(.4/.8)
    Ring 5 cadence: 60(2/4)

Voice > Regional > Ring and Call Waiting Tone Spec
    CWT frequency: 400@-10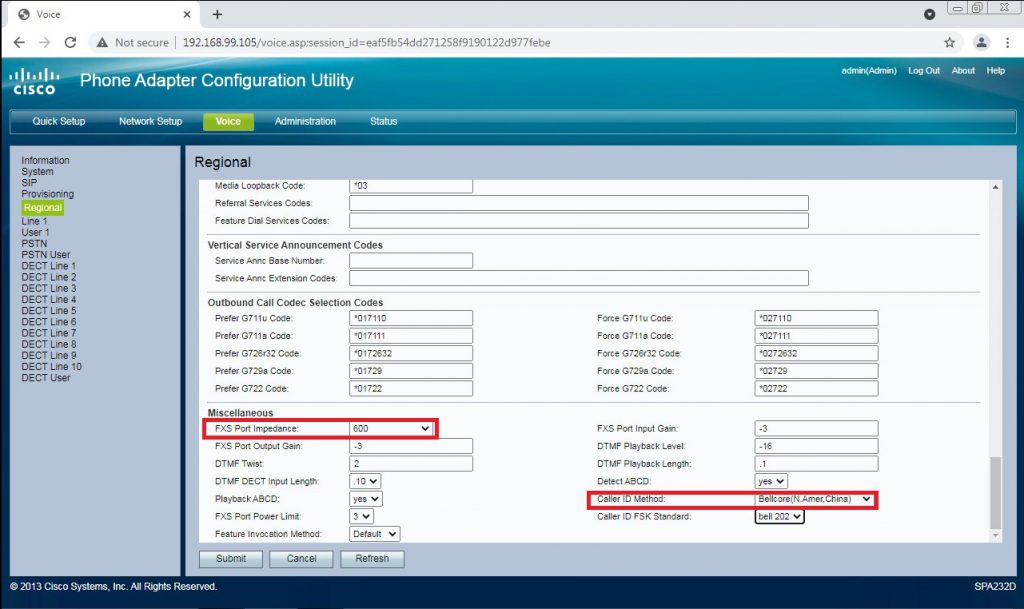
Voice > Regional > Miscellaneous
    FXS Port Impedance: 370+620||310nF (or 270+750||150nF )
    Caller ID Method: ETSI FSK With PR(UK)
Note the two fields for gain here. As they stand they are normally ok but we have had to tweak these on longer lines. A little is a lot though so be careful. Submit your changes and wait for the UI to return.
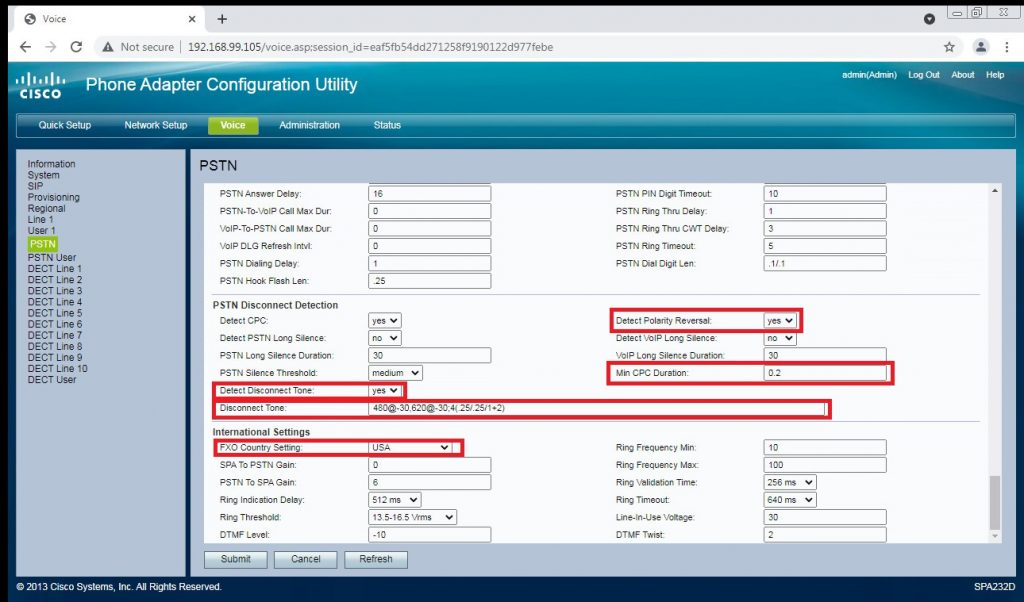
Voice => PSTN
Scroll down to the bottom of this page. We will be back here in a minute but we need to make these changes…
Voice > PSTN > PSTN Disconnect Detection
    Detect Polarity Reversal: no
    Min CPC Duration: 0.09
    Detect Disconnect Tone: yes
    Disconnect Tone - 400@-30,400@-30; 2(3/0/1+2)
Voice > PSTN > International Settings
    FXO Country Setting: UK
Click submit and as far as UK setup goes, you are done.
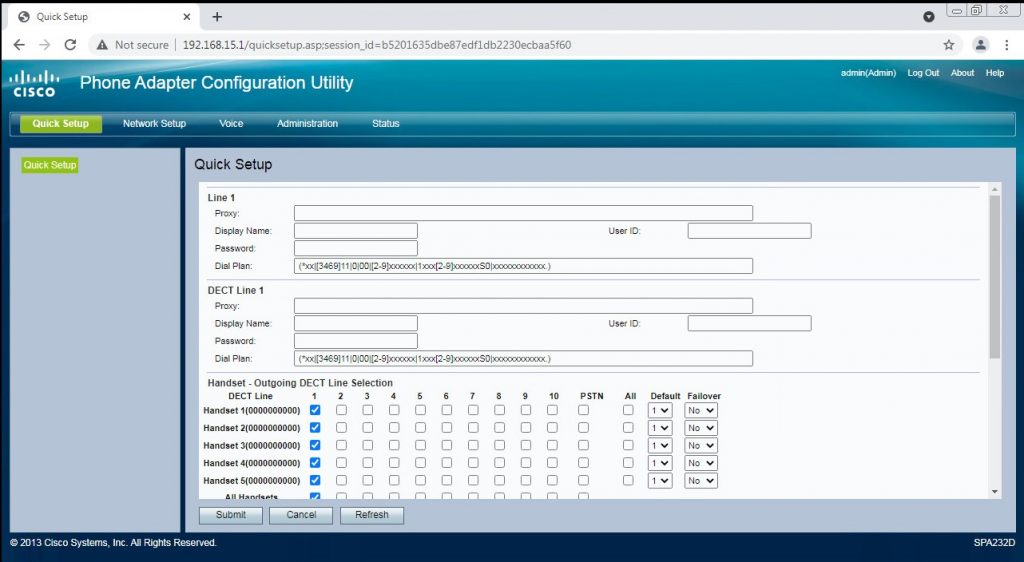
You will need the CID for this line and to set a password. The CID is used for call routing and the PJSIP setup rather than a username, you have a little less flexibility here than Chan_SIP and mistakes here will make this behave in odd ways.
Voice => Line 1
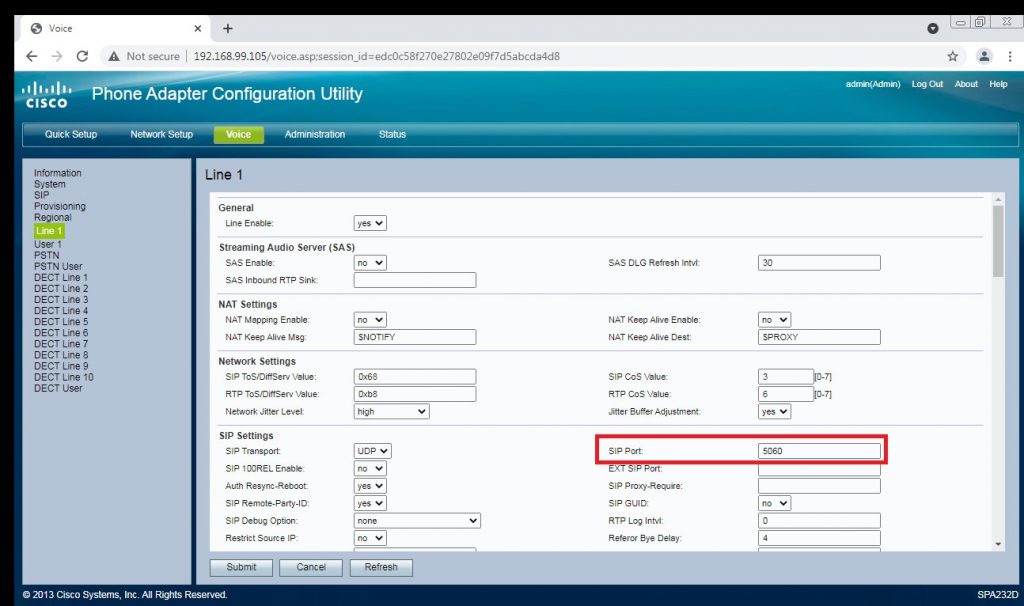
Change SIP Port to 5060, these are (for some reason) reversed between this and the next page. They *should* be different and this caused no end of headaches until someone elsewhere pointed out the documentation is wrong. Prior to changing this we were seeing calls out fail with channel unavailable and the cause given as incomplete number supplied.
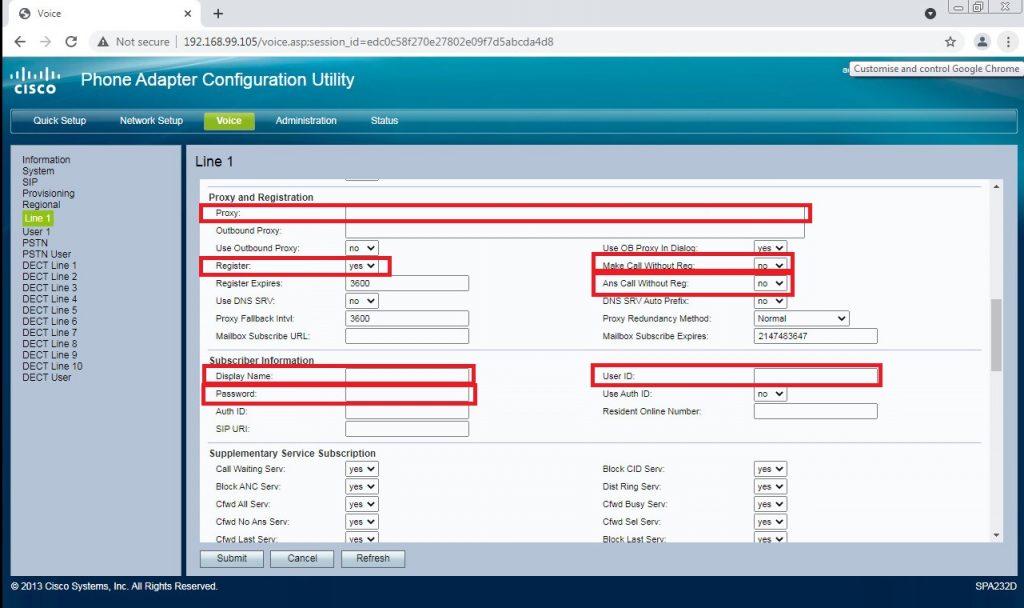
Proxy & Registration
Set the proxy to the IP of your Freepbx Server. Change “Register” to no, “Make Call Without Reg” and “Ans Call Without Reg” to yes.
Subscriber Information
Set “Display Name” and “User Id” to your DID. These must match the PJ Sip trunk name we will create in a bit. There are some odd UI behaviours setting these up in FreePBX, this just makes life easier for all. Password is what you’ll set in Freepbx for this trunk so set these and keep them for later.
Hit Submit and wait for it to come back, we are halfway there.
Skip User 1 and we want to be in the PSTN settings now…
SIP Settings
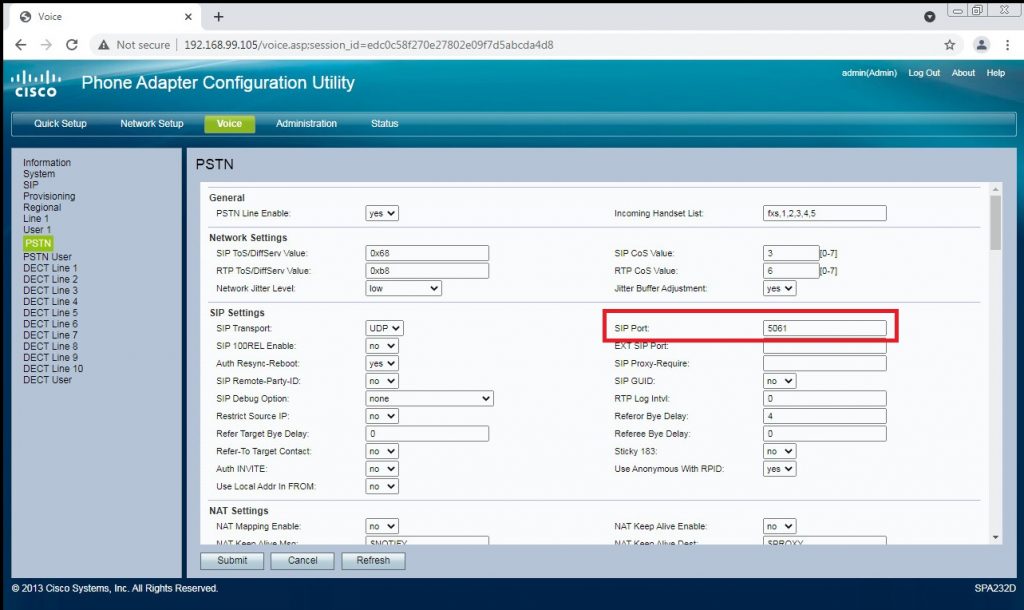
Change SIP port to 5060. Again not quite sure why this is needed and why so much documentation has it wrong, but it seems to be what really upsets PJSIP.
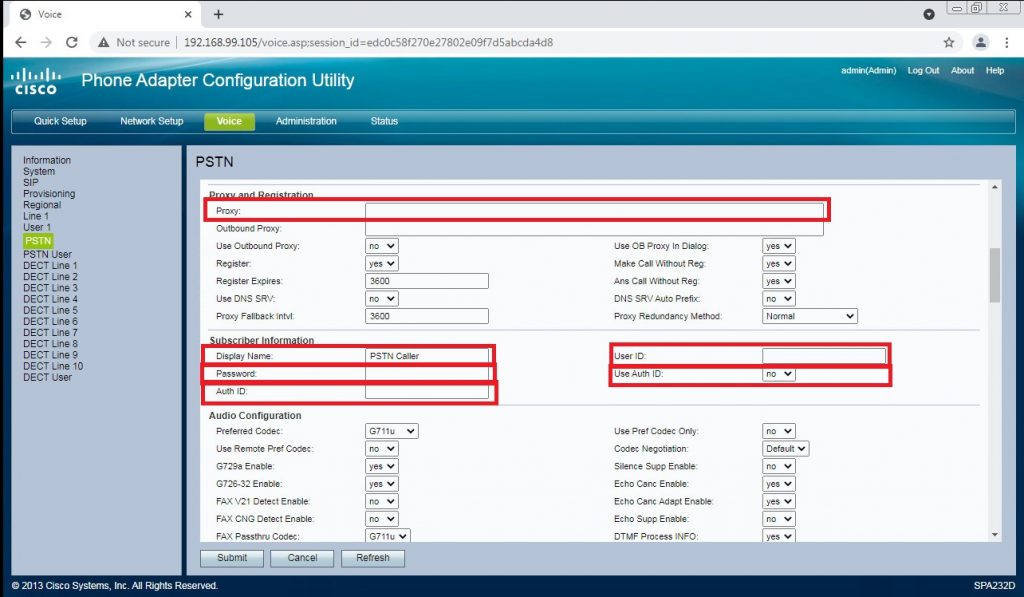
Proxy & Registration
Set Proxy to the IP address of your Freepbx box. Display name, User Id and Auth ID should be your DID and Password the one you already used. A few guides say it is important to leave display name blank. Again doing so seems to occasionally trip PJSIP by mangling headers.
Dial Plans
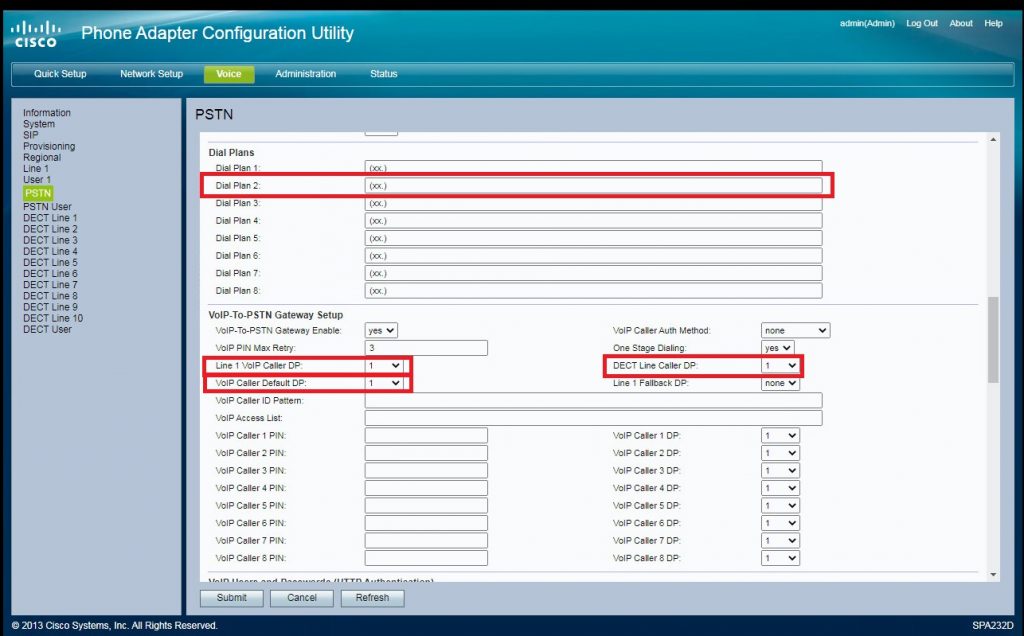
Leave Dial Plan 1 alone. Set 2 as follows. Watch the brackets!
S0<:123456789@127.0.0.1>Change 123456789 for your DID. This is what will be matched for your inbound route. You can change this to anythign you like but typically trunks are matched on the DID and Freepbx has limitations on the DID field. Keep it simple! 127.0.0.1 should be replaced with the IP of your freepbx box.
Voip-To_PSTN Gateway Setup
Set Line 1 Called DP and Voip Caller DP to none. Not sure why I highlighted the DECT one, we aren’t using it.
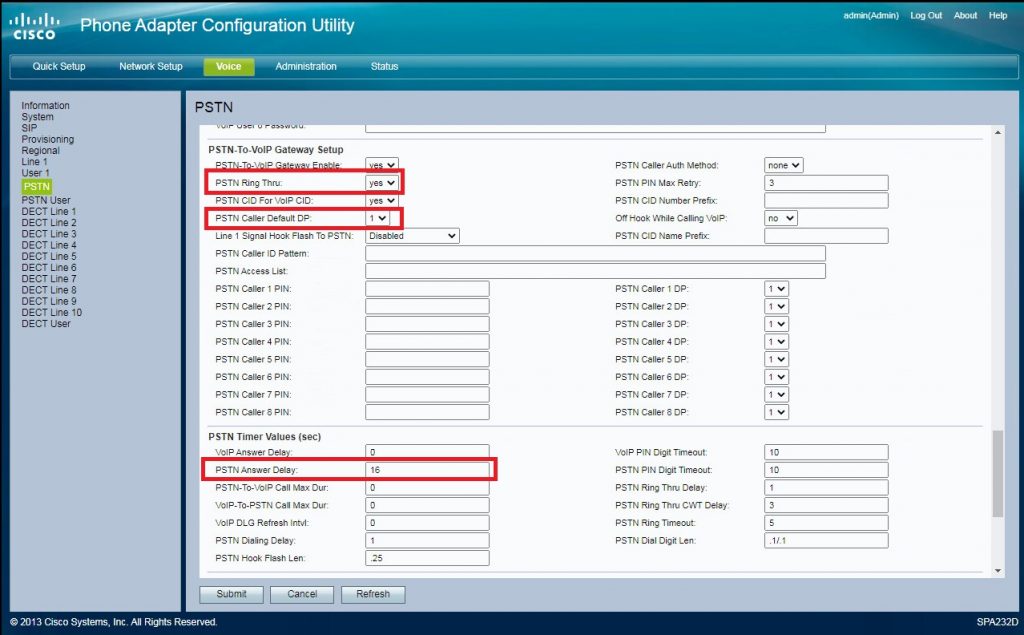
PSTN-To-VoIP Gateway Setup
Set PSTN Ring Through to no. This is personal preference but can help mask the occasional appearance of two ring tones after dialling. PSTN Caller Default DP changes to to, pointing at the dial plan we created earlier to route the call to Freepbx.
PSTN Timer Values (sec)
Change PSTN Answer Delay to 1. This is how many rings before the FXO seizes the line. There is anecdotal evidence that while 0 works it can cause some odd race conditions. We have set everything else we need to now, so hit submit and wait for the reboot.
FreePBX
I’m only going to cover getting the trunk setup. Routes etc are down to you. If you’ve followed my example and used your DID you’ll be able to match on this. No Pictures here as I don’t want my PBX info all over the net 🙂 Maybe I’ll redo this with a lab setup.
Add a new PJsip Trunk. Name your trunk as your DID. Set your caller ID to match your DID and max channels to 1. Everything on “General” stays on defaults
Under PJsip settings…
Authentication to None
Registration to None
SIP Server is set to the IP of your SPA, this is where you may want to set a static IP for it.
SIP Server port is set to 5060
Under the advanced tab set:
Permanent Auth Rejection to Disabled (Unchecked)
Forbidden Retry Interval to 10
General retry Interval to 15
Expiration to 60
Max Retries to 10
Qualify Frequency to 15
Submit then apply settings. If you’ve had calls while setting up you *may* need to go check the Intrusion Detection module and make sure your SPA hasn’t been blacklisted.
I realise there are almost certainly settings that don’t need to be changed here BUT this is a copy of what eventually worked for us. The whole thing seems way more picky than CHAN_SIP but this setup does work. I hope it helps someone.