Well its been a while but it has been manic here. However after some faffing with getting some backups working I thought I’d pop this up here as it covers a fair bit.
A customer wants to sync their office server to one of our so their engineers can get to CAD drawings. Now the basics of getting everyone up using SCP et all are pretty simple so I wont go into those. However the sync was problematic. The server is a Windows 2012 server and we popped on cwRsync and Syncovery. No way could we get Rsync to play ball however in the end we made SCP play. This isnt ideal but we will come back to it.
Next up was to put this server to good use and backup various other things. We do have a large number of PFSense, freePBX and Freenas boxen about the place and I thought it would be nice to make these work.
Now, key to this is making SSH work without passwords. You’ll find pretty quickly this isnt exactly non trivial in fact its a royal PITA. Most of the gudes arent quite there or dont work quite right. After a lot of digging I got there with a really simple and elegant solution.
So we need to pair up our client (in this example a PF box but this works on FreeNAS too and *should* work on FreePBX).
Create a user for the backup, using root isnt a good idea at all, remeber this box will have direct access to your server and if you use root and your customer decides to tinker they could in theory do a LOT of damage. Set up a user to use for the backup, we are going to create a backup user called ‘companya’ so on your server do:
useradd companya
passwd companya
You can do the same on the system to be backed up. Its much nicer if it all matches. You can assign multiple keys to an account so you dont need to do this again on the server end. Setting up home dirs is covered elsewhere so I wont go into that. I’ve created a structure in the home dir called backups and in t here used hostnames to identify the device. If you are backing up multiple customers you really should make sure they cant get to eachothers files.
On PFSense you need to do this through the user interface. Make sure that the user’s permissions include shell access else the permissions and default shell for that user will get nuked every reboot.
Now this is where it tends to go a bit runny. We are going to use SSH so we need SSH to be able to log in with just an rsa key. This *should* be easy, however getting FreeNAS to play was a pig. Turns out there is a magic command. So, on the system to be backed up we need to become our new user and make a key…
su companya
ssh-keygen -t rsa
*NOTE: DO NOT SET A PASSWORD!* Now this key has to go into the list of authorised keys at the other end. There seem to be billions of ways to do this but they all gave varying amounts of success. Now provided you created a user on the server and accept the defaults for ssh-keygen the following will do the trick…
ssh <yourserver> mkdir -p .ssh && cat ~/.ssh/id_rsa.pub | ssh <yourserver> ‘cat >> .ssh/authorized_keys’ && ssh <yourserver> chmod -R 700 .ssh
You should be asked for the password for companya twice. This will make the .ssh dir, upload they key and make sure its CHMOD’ed correctly. Note I have seen references to chmoding the authorized_keys file to 600 if you see errors on your /var/log/auth or /var/log/security
Now if all has gone well. you can do:
ssh <serverip>
If you get asked for a password you’ll have to go chase down why. The log files above may help but the usual cause is permissions. Type exit to bring you out of the SU and you are done here.
So now, to backups….
FreeNAS
You can now enable Rsync on your server which is explained elsewhere then use the Rsync Tasks under system to create backup jobs. Make sure you use your new user to do this else nothing will work. Its that simple.
To back up the config requires something a little like the PFSense solution below. As we have Rsync already running over SSH we may as well use that.
Make yourself a directory on a visible share for your backup, you could use this to aggregate a number of backups at this point. As we will be using rsync only changes will be backed up so this may be a good point to put router backups etc. For this we have a volume called adminnas and I’ve created a folder called sysbackups.
Now we need to make a file to DO the backup. It seems sensible to drop this in the backup folder too so things are kept neat. This means less work if the main OS partition goes AWOL.
#!/bin/bash
# Freenas backup script by R.Inskip
# This maintains two copies of the FreeNAS backup file
#
# Change to suit your config
#
SOURCE=/data/freenas-v1.db
TARGETDIR=/mnt/adminnas/sysbackups
TARGETFILE=adminnas.db
BACKUPFILE=adminnas.old.db
#
# If there is an old backup, remove it
[ -f $TARGETDIR/$BACKUPFILE ] && rm $TARGETDIR/$BACKUPFILE
#
# if there is a backup here already rename it
#
[ -f $TARGETDIR/$TARGETFILE ] && mv $TARGETDIR/$TARGETFILE $TARGETDIR/$BACKUPFILE
cp $SOURCE $TARGETDIR/$TARGETFILE
make the changes to reflect your setup and save the script. Dont forget to CHMOD it!
And off to cron now. Add a cron job, the timings are up to you. Your Rsync job should tie up with this however you could have this backup more often so you keep a local copy and then pickup the backups with Rsync less frequently, its totally up to you. Bear in mind that once your setup is stable FreeNAS tends to get left alone, frequent backups may be counter productive and you can always go and manually run your script if you are playing about. Your cron job needs to call the script you just saved. Set it to just ahead of the system clock to make sure all works.
All being well you can now setup your Rsync to drop it into the right place, et voila!
PFSense
First up make your backup script. We will be using SCP so make sure that your backup user can do passwordless logins.
Create a backup script, dropping this in root is just fine. We used:
#!/bin/sh
PATH=/usr/local/sbin:/usr/local/bin:/sbin:/bin:/usr/sbin:/usr/bin
now=$(date +”%T”)
logger Automatic backup running at $now
/usr/bin/su <BACKUPUSER> -c “/usr/bin/scp /conf/config.xml <backupuser>@someserver.domain.com:/home/<backupuser>/backups/pfsense
The script above drops a file in the system log to say when the backup last ran. Make sure you change this to reflect your system and save it as backup.sh, chmod it and them make sure you can run it on the command line and it works.
You need to muck with Cron. The easiest way is to install the Beta CRON module and do it there. The command line you want to do the backup for cron is…
/root/backup.sh
Obviously you’ll need to change <youruser>,<yourserver> and <backupdir>. You can manually add it to /etc/cronttab by adding…
00 01 * * * root /root/backup.sh
Again make sure you correct to reflect your setup. This job is set to run daily at 01:00.
FreePBX
This one is is a little bit more convoluted. There is a backup UI in FreePBX but it doesnt handle the setup of the SSH side, expecting you to have done this. So assuming you’ve done the steps above on your FreePBX system you should be ok.
If you are going to use root or asterisk as your backup user thats all great and you can use the ui. However in this scenario I dont want that. I want customer backups to go to the right customer folder. This is a little harder than it needs to be but its not difficualt once you know what is going on. All scripts are run as the ‘asterisk’ user. This cant see the key we have made so we need to copy it. To really add to the fun FreePBX mucks with the permissions of asterisk’s .ssh directory on reboot so whil you may get this working first time, it wont after a reboot. Moving the key elsewhere fixes this. You will have to do this as root…
mkdir /home/asterisk
cp /home/backupuser/.ssh/id_rsa /home/asterisk/backup_rsa
chown -R asterisk /home/asterisk
chgrp -R asterisk /home/asterisk
chmod 700 /home/asterisk
chmod 600 /home/asterisk/backup_rsa
You should now be able to setup a backup server in the FreePBX backup/restore dialog. So for our example….
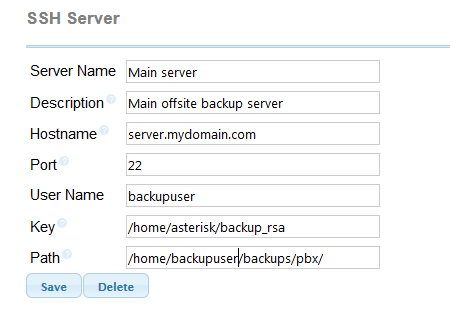
again make sure you change paths etc where needed.
Not be be picky but FreeNAS, FreeBSD, and Pfsense are Unix-es, not Linux platforms.
I know all Unix OS-es are similar, all are Unix-based.
Unix is not Linux, but Linux is Unix. HAHA
Noted and I know that having also used Ultrix, AIX, Irix and HPIX